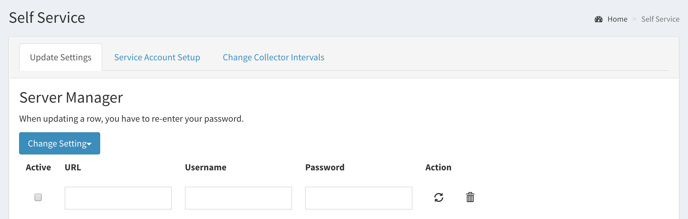
Start with Server Manager
- Click Settings in the left sidebar and select Update Settings from the dropdown menu.
- Enter your Server Manager URL, the Server Manager Username (that has console admin access) and the Server Manager Password.
- Check the box on the left-hand side to make your entry Active.
- Then, click + to add the server. A dialog box will verify New row successfully added. Repeat these steps to add more servers as needed.
Add Database Manager settings
Clarity's collector can connect to an iSeries, SQL or Oracle database to pull vital health and operational metric data. Configuration requires:
- Database server fully qualified domain name (FQDN)
- Database name (usually JDE_Production)
- Schema name (i.e., E1 9.0 schemas are usually SVM or SY and located in the JDE_90 table.)
- Credentials for a database ID with read-only access
For SQL database, you also need:
- Read-only access to SQL Server system tables/views
- Read-only access to JD Edwards System (SYS*) and Server Map (SVM*) schemas
Recommended statement:
| CREATE LOGIN [CLARITY] WITH PASSWORD= ’xxxxxxx’, DEFAULT_DATABASE=[master], DEFAULT_LANGUAGE=[us_english], CHECK_EXPIRATION=OFF, CHECK_POLICY=OFF GO GRANT VIEW SERVER STATE TO CLARITY GO
|
For Oracle database, you also need:
- Read-only access to Oracle system tables/views
- Read-only access to JD Edwards System (SYS*) and Server Map (SVM*) schemas
Recommended statement:
| CREATE USER CLARITY IDENTIFIED BY “xxxxxxxxx”; ALTER USER CLARITY PROFILE no_expire; GRANT CONNECT TO CLARITY; GRANT SELECT ANY TABLE TO CLARITY; GRANT SELECT_CATALOG_ROLE to CLARITY;
If the Oracle version is 12 or above your no expire should look like...
alter user CLARITY profile C##NO_EXPIRE
|
iSeries users must set up ODBC entry and need:
- Read-only access to QSYS2 schema
- Read-only access to JD Edwards System (SYS*) and Server Map (SVM*) schemas
Click the Change Setting button and select DB Manager
- Enter your database server DNS Name (fully qualified domain name) and your Database (usually JDE_Production).
- Add your database Username and Password.
- Then, select your database engine from the dropdown menu (SQL, Oracle, or iSeries).
- In the last Name column, repeat your DNS Name.
- Check the box on the left-hand side to make your entry Active.
- Finally, click + to add the database. A dialog box will verify New row successfully added. Repeat these steps to add more databases as needed.

Add Batch Manager settings
- After adding your database, click the blue Change Setting button again. Select Batch Manager from the dropdown menu.
- Enter your database server DNS Name (fully qualified domain name).
- Add the Database where Batch Manager information is located (usually JDE920).
- Add your database Username and Password.
- Enter the Batch System Owner (usually table SVM9x0) and JDE System Owner (usually table SY9x0).
- Finally, select your DB Engine from the dropdown menu (SQL, Oracle, or iSeries).
- Check the box on the left-hand side to make your entry Active.
- Finally, click + to add the batch manager. A dialog box will verify New row successfully added. Repeat these steps to add more databases as needed.

Add Log Parser settings
Clarity can process any unencrypted text-based log file and alert you on defined keywords. This can help you find and resolve issues quicker than ever. Log parser requires access to file locations and file access credentials including:
- Full log parse path
- Filenames of all log files to be processed (i.e., JDE enterprise server, HTML server, WebSphere/Weblogic, Server Manager)
Click the Change Setting button and select Log Parser
- Enter your full log parse File Path. (Note: Change drive from D: to D$)
- Add the beginning of the log parse name in the File Name field. This can be as simple as the first letter of the file name.
- Add the log parse File Extension (i.e., .log or .out).
- Enter your log parse Username and Password.
- Select your server OS from the dropdown menu (i.e., Windows, Linux, or iSeries).
- Check the box on the left-hand side to make your entry Active.
- Finally, click + to add the log parser. A dialog box will verify New row successfully added. Repeat these steps to add more servers as needed.

Add Synthetic Monitor settings
Synthetic monitoring requires login credentials and links to all web servers to be tested.
- After you have added your log parser, click the blue Change Setting button again. Select Synthetic Monitor from the dropdown menu.
- Enter your web server instance URL.
- Add the web server instance Username and Password.
- Enter a Timeout (sec) value. This defines how long it takes before synthetic monitoring throws an error in Clarity.
- Check the box on the left-hand side to make your entry Active.
- Finally, click + to add the synthetic monitor. A dialog box will verify New row successfully added. Repeat these steps to add more monitors as needed.

Specify server instances
- Click the Change Setting button one last time. Select Server Manager Settings to specify your server instances.
- In the first field, enter your Server instance name. You can find it in the righthand column in Server Manager.
- Then, select your Server Type from the dropdown menu (Enterprise or Web Server).
- Check the box on the left-hand side to make your entry Active.
- Click + to update Clarity.

From this point on, updates are a breeze. Revisit these screens anytime to add or delete your settings.
Topics: